

Most warranty disputes for composite decking trace back to two causes — the wrong cleaning product, or a stain left too long. Both are easy to prevent. For distributors and trade partners, clear care guidance at point of sale is the fastest way to cut after-sales queries and protect the warranty.
This guide covers routine cleaning, stain removal, mould treatment, and warranty scope for capped composite decking. Use it to brief your trade customers, handle common complaints, and speed up warranty resolution.
Key Takeaways
- Capped composite decking has a 0.8 mm HDPE cap layer. Bleach, solvents, and abrasive tools can breach it and void the warranty.
- Water absorption sits at 0.2% per ASTM D1037 — most stains stay on the surface and come off easily if treated early.
- Mould on composite boards feeds on surface dirt, not the board itself. Fixing drainage and airflow matters more than stronger chemicals.
- Residential warranties for capped composite decking range from 15 to 30 years across the Australian market. Coverage scope and exclusions vary — check the terms, not just the number.
- Boards that stay wet for days or show mould along one edge likely have a drainage or installation issue, not a cleaning problem.
What the Warranty Covers — and What Voids It
Composite decking warranties cover defects that arise under normal use and maintenance. Covered issues include surface cracking, edge lifting, warping, breakage, and colour fade beyond the range set in the purchase contract. Damage from incorrect installation, misuse, or banned cleaning products is not covered.
For distributors, this distinction is the first filter for every after-sales query.
How Do Warranty Periods Compare Across the Market?
Warranty length varies across brands and product tiers. The table below shows residential warranty periods for major capped composite decking brands available in Australia.
| Brand | Product Tier | Residential Warranty |
|---|---|---|
| LastElegance TimberLuxe | Premium capped | 30 years |
| NewTechWood UltraShield | Premium capped | 25 years |
| Trex Transcend | Premium capped | 25 years |
| Modwood XS | Capped | 25 years |
| EVODEK | Capped | 25 years |
| Eva-Last | Capped | 25 years |
| LastElegance VerdeLife | Mid-range capped | 20 years |
| Ekodeck Designer | Capped | 20 years |
| LastElegance Renew | Entry-level capped | 15 years |
| Ekodeck Classic | Uncapped | 15 years |
Warranty length alone doesn’t tell the full story. What matters for distributors is what the warranty actually covers, what voids it, and how claims are processed. Read the terms for each brand — coverage for colour fade, structural defects, and surface damage differs.
The Cap Layer: Why It Matters for Warranty
The cap layer is a capped composite board’s first line of defence. At 0.8 mm thick, it shields the composite core from UV, moisture, and surface wear. Once breached, the board loses that protection — and any warranty claim becomes harder to support.
Four things damage the cap layer and void the warranty:
- Chlorine bleach (sodium hypochlorite) or chlorine-based cleaners
- Solvents, acetone, or oil-based deck cleaners
- Wire brushes, metal scrapers, or abrasive pads
- Sanding the board surface
The other common warranty trigger: food spills left longer than 7 days. Composite decking’s water absorption is just 0.2% per ASTM D1037 — so most stains sit on the surface rather than soaking in. Treat them within a week and they come off. Leave them, and the stain may become permanent.
Give buyers a one-page care sheet at point of sale. It takes two minutes and prevents the most common warranty disputes.
Routine Cleaning: The Standard Method
Warm soapy water and a soft-bristle brush handle most routine cleaning on composite decking. No sanding, oiling, or re-staining is needed. Attempting any of those will damage the cap layer.
Standard cleaning process:
- Clear surface debris with a broom, leaf blower, or plastic shovel before wetting the boards.
- Rinse the deck surface with a garden hose to loosen dirt.
- Mix mild soap into a bucket of warm water.
- Scrub along the board grain with a soft-bristle brush — never across it.
- Rinse each section before moving on. Dirty water left to dry leaves a dull film.

Two points worth passing on to end users. First, always pre-rinse — dry grit under a brush still scratches. Second, avoid cleaning in direct sun on a hot day. The cleaning solution dries before you can rinse it off, leaving a white film that needs another pass.
Can You Pressure Wash Composite Decking?
Yes — with the right settings, capped composite decking handles pressure washing well.
Keep the pressure washer at or below 1,500 psi. Fit a fan-tip nozzle — never a pinpoint jet. Hold it at least 200 mm from the deck surface. Work along the board grain.

A pinpoint nozzle forces too much pressure onto one spot. It can scuff the cap layer and leave white marks that won’t come out. Older uncapped boards are more prone to damage — drop the pressure or use a garden hose instead.
Before using a pressure washer, check the care guide for the specific board series. Approved pressure, fan-tip type, working distance, and spray direction can differ between products. Don’t copy settings from another brand or project.
Safe Products vs Products That Damage the Cap Layer
The right deck cleaner keeps the cap layer intact. The wrong one wears it down and may trigger a warranty dispute.
| Safe to use | Avoid |
|---|---|
| Warm soapy water (mild soap) | Chlorine bleach (sodium hypochlorite) |
| Composite-specific deck cleaner | Oil-based cleaners |
| White vinegar (hard water stains) | Abrasive pads or wire brushes |
| Oxalic acid deck brightener (rust, tannin marks) | Acetone or solvents |
| Oxygen bleach / sodium percarbonate (mould, general brightening) | Acid-based cleaners (hydrochloric, phosphoric) |
A note on bleach: not all bleach is the same. Chlorine bleach (sodium hypochlorite — common household bleach) can fade and damage composite boards. Oxygen bleach (sodium percarbonate, sold as “napisan” or “oxygen brightener”) is safe for most capped composite and works well on mould. Vinegar is another common option — it handles hard water marks, but is acidic and may change the colour or sheen on some capped finishes. Always check the label and patch-test any product on a hidden area first.
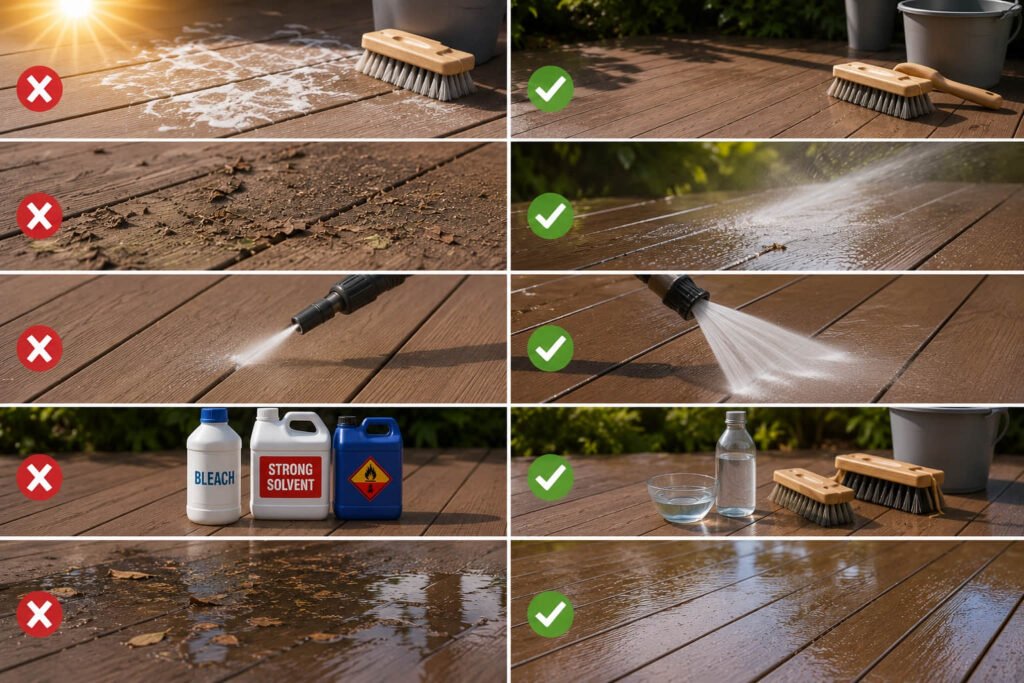
If a customer asks about a specific product, check the manufacturer’s label first. Some products marketed for decks contain chemicals that aren’t safe for composite boards. “Composite-safe” on a label doesn’t mean safe for every composite product. When in doubt, warm water and mild soap is the safest default.
Two less obvious risks: excess dwell time — cleaner left to dry on the surface leaves a visible film; and unapproved oxalic acid — it may shift the board colour. Always follow the stated dwell time and rinse before the product dries.
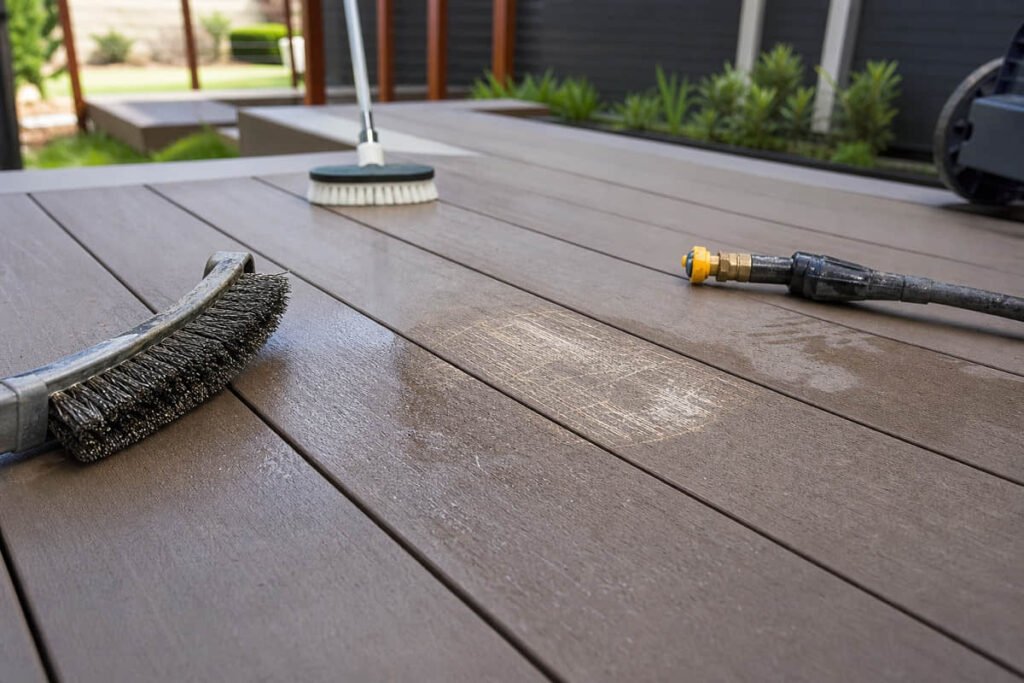
If an unsuitable product reaches the boards, rinse it off with clean water. Don’t add another chemical to try to neutralise it. Ask the manufacturer for advice if the finish changes.
Never mix cleaning products. Common household cleaners can create harmful fumes or react with the board surface. Keep people and pets clear until the deck dries.
How to Remove Common Stains
Act fast. The sooner a stain is treated, the easier it comes off the deck surface.
| Stain type | Method | Product |
|---|---|---|
| Food and grease | Scrub with soft-bristle brush — act within 7 days | Warm soapy water |
| Mould and mildew | Clear debris first, scrub along the grain | Warm soapy water or oxygen bleach |
| Hard water marks | Apply, sit a few minutes, scrub and rinse | White vinegar |
| Rust stains | Apply carefully, rinse with clean water | Oxalic acid deck brightener |
| Leaf and bark tannins | Scrub with soft brush, rinse well | Oxalic acid deck brightener |
| Sunscreen or insect repellent | Blot excess, scrub promptly — don’t let it set | Warm soapy water (degreasing dish soap) |
| Wet paint drips | Wipe off immediately with a damp cloth | Water only — no solvents |
| Dried paint spots | Lift gently with a plastic scraper, then wipe | Plastic putty knife — never metal |
| Concrete or cement dust | Follow product instructions — don’t let it dry | Concrete dissolver |
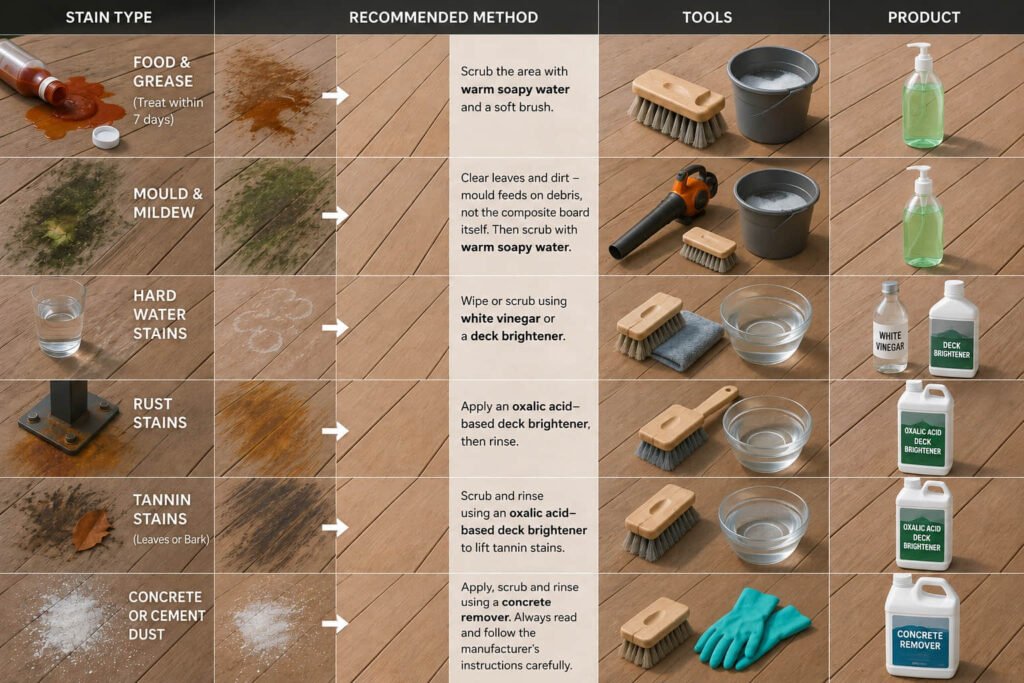
Wear gloves, eye protection, and closed shoes with good grip when using any cleaning product. Read the product label before mixing — check the dilution ratio, dwell time, coverage, and runoff advice.
Mould and Mildew: Diagnosis Before Treatment
Mould on composite boards does not mean the board has failed. Composite decking is not organic — mould can’t feed on it. Mould grows on surface biofilm left by pollen, dirt, food residue, and other debris.
The real cause usually sits around the deck, not within the board. Blocked gaps, planter runoff, shade, and poor airflow keep the surface damp for days. Unless you fix that moisture source, mould returns after each wet spell — and so does the call-back.
Identify the Board and Inspect the Site
Check the product series, purchase record, or installation file before choosing a cleaner. A product approved for one capped board may dull another. If you can’t identify the board, default to warm water and mild soap.
Remove furniture, mats, and pots. Sweep away leaves, soil, pollen, and bird droppings. Check board gaps, wall edges, downpipes, drains, and shaded corners — water and organic debris tend to collect there.
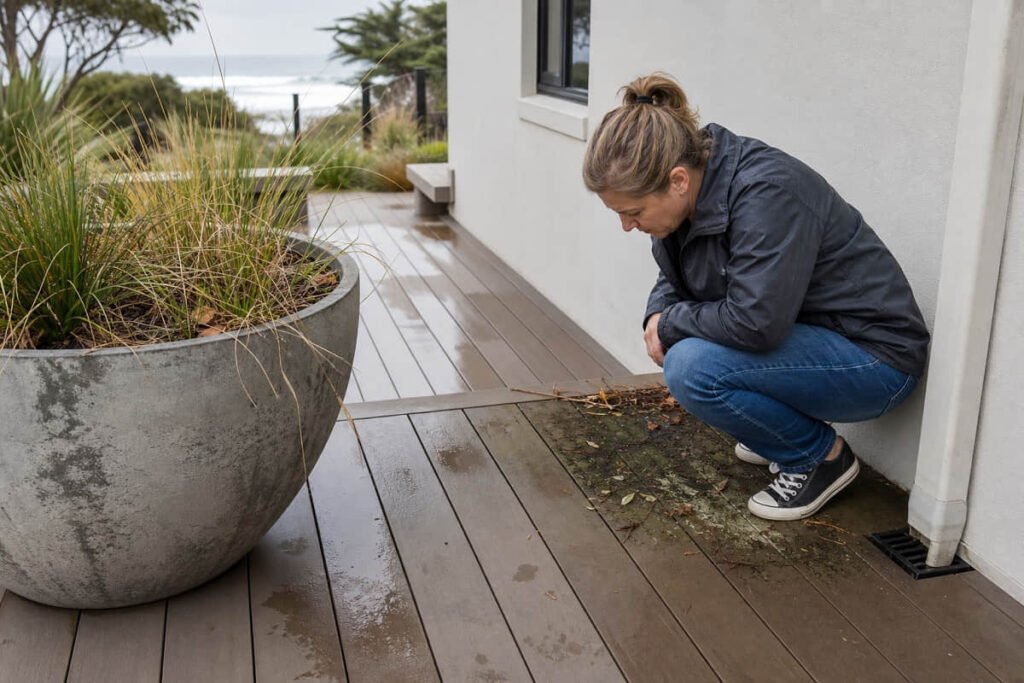
On coastal projects, mould often starts beneath planters beside solid walls — the boards are sound, but the area gets little sun or airflow. If the cause isn’t clear, check the deck after rain. The slowest area to dry will usually develop mould first.
Patch-Test, Then Clean in Sections
Apply the cleaner to an offcut or hidden area first. Use the same mix, brush, and dwell time you plan for the full deck. Rinse and let the test patch dry. Stop if the surface looks dull, fades, or feels rough.
Once the test passes, divide the deck into sections you can clean before the product dries. Brush along the grain with steady pressure. Rinse each section before moving on. Let the entire deck dry before judging the result — repeat the mild process before stepping up to a stronger cleaner.
Stubborn Black Spots
Black marks don’t always mean mould. On sound capped boards, they often form within damp pollen, soil, or food residue.
| What you find | First response | Next check | Stop work when |
|---|---|---|---|
| Light green film | Warm soapy water, soft brush | Inspect after drying | The finish changes |
| Local black spots | Approved composite deck cleaner | Check nearby moisture traps | Colour begins to fade |
| Heavy mildew stains | Request board-specific advice | Test a hidden area | Surface feels rough |
Record keeping matters for warranty queries. Photograph the area before and after cleaning. Note the product used, mix ratio, dwell time, date, and weather. These details can resolve a warranty dispute — or prevent another site visit.
Fading, Scratches, and Surface Damage
Some colour shift in the first months after installation is normal. UV exposure causes a slight change as the surface stabilises — this is not a defect. After 3,000 hours of QUV accelerated aging, colour difference stays within ΔE ≤ 4–5 depending on the shade. The warranty covers colour fade that exceeds the range set in the purchase contract. If a customer reports fading, compare the board against a stored offcut or colour sample — not their memory.
Minor surface scuffs can occur from dragged furniture, dropped tools, or grit. Advise end users to fit protective pads under furniture legs and clear debris before heavy foot traffic. Wire brushes, metal scrapers, and sanding all void the warranty.
Is It a Cleaning Issue or an Installation Issue?
Start with the growth pattern. Scattered marks after wet weather usually point to surface dirt and slow drying. Growth along one edge suggests drainage or airflow trouble.
| Site pattern | Likely cause | Action |
|---|---|---|
| Mould beneath pots or mats | Trapped surface moisture | Clean area, raise items off surface |
| Growth along one wall | Shade, runoff, or poor airflow | Check fall and edge clearance |
| Growth around blocked gaps | Debris blocking drainage | Clear gaps without damaging clips |
| Boards stay wet for days | Drainage or ventilation fault | Inspect subframe and levels |
| Boards move or lift | Possible board or subframe fault | Close area, arrange inspection |
Cleaning can’t fix poor fall, blocked drainage, or weak airflow. If the boards move, lift, feel soft, or won’t dry, the issue likely sits in the subframe or site drainage — not the board surface.
For distributors: if a warranty query involves the bottom two rows in this table, request site photos and installation records before processing. These patterns point to installation or site issues, which fall outside warranty coverage.
How Often Should Composite Decking Be Cleaned?
For most Australian conditions, a full clean twice a year is enough — once in spring, once in autumn. A rinse with a garden hose every few weeks keeps dirt from building up.
Some locations need more frequent care:
- Coastal areas — salt air builds up on surfaces faster than expected. Rinse monthly, more often in exposed spots.
- Under trees — leaf tannins stain composite decking quickly. Clear debris often and treat discolouration early.
- High-humidity zones (QLD, NT) — biofilm builds up fast in warm, wet conditions. Quarterly cleaning is a good baseline.
- Bushfire-prone zones — after a fire event, rinse ash from the deck before rain. Ash is alkaline and can mark the surface if it sits wet. Clean water is enough.

Preventing Call-Backs: Design and Handover Checklist
Prevention starts during design. The deck must shed water, maintain airflow, and stay easy to inspect.

Drainage: direct downpipes and irrigation away from the deck. Keep soil and mulch below board edges. Follow the specified board gaps and joist spacing. Avoid details that trap runoff against walls.
Airflow: walls, screens, planter boxes, and low subframes can create damp pockets. Check their effect on ventilation before locking in the layout — especially on shaded and coastal projects.
Access: keep drains, board gaps, and debris traps reachable. Avoid placing fixed furniture or planters over key access points.
Handover documentation: record and pass on the board series, care guide, drainage points, approved cleaning method, and warranty terms. Distributors who include this at point of sale report fewer repeat queries and smoother warranty discussions.
FAQs
What’s the best way to clean composite decking?
Warm soapy water and a soft-bristle brush handle most routine cleaning. Rinse the surface first to clear debris, then scrub along the board grain. Rinse each section as you go to stop dirty water from drying on the surface.
Can you use a pressure washer on composite decking?
Yes. Keep the pressure at or below 1,500 psi, fit a fan-tip nozzle, and hold it at least 200 mm from the surface. Never use a pinpoint jet — it can scuff the cap layer and leave marks that won’t come out.
Should you sand or oil composite decking?
No. Composite decking never needs sanding, oiling, or staining. Sanding a capped board removes the cap layer and voids the warranty.
How do I tell if a complaint is a warranty issue or an installation issue?
Check the growth pattern and site conditions. Scattered marks after rain usually mean surface dirt. Growth along one edge or persistent dampness points to drainage or installation issues — which fall outside warranty coverage. Photograph the area and check installation records before escalating.
How does composite decking maintenance compare to timber?
Timber needs sanding and oiling every 1–2 years. Composite decking doesn’t. That’s a direct labour and material saving over the life of a project — worth raising at specification stage.
Composite decking is low maintenance — but low maintenance isn’t zero maintenance. The right cleaning habits protect the board, the finish, and the warranty.
For distributors and trade partners: give buyers clear care guidance at point of sale. It cuts after-sales queries, speeds up warranty resolution, and builds long-term confidence with your customers.
For product specs, trade pricing, or warranty support, contact our sales team or request free samples to evaluate the range.