

Most composite decking failures trace back to installation, not the product. Wrong joist spacing, skipped expansion gaps, or a trapped-moisture subframe mean lifting the whole deck and starting again.
Australian conditions make these mistakes more expensive. Board surfaces hit 60°C in summer. Coastal salt air corrodes fasteners. And in BAL-rated zones, a compliance failure adds an inspection issue to the rework bill. Most installation mistakes also void the warranty, a direct liability for the builder.
This guide covers the eight most common mistakes on Australian job sites. For the full install process, see our composite decking installation guide.
Mistake 1: Wrong Subframe Material
For composite decking, use a subframe of galvanised steel, aluminium, or H3/H4 treated timber. These materials handle Australian conditions — moisture, humidity, and coastal salt — without breaking down early. Composite boards are built to last 15–25 years. A subframe that rots in five to seven years defeats the purpose entirely.
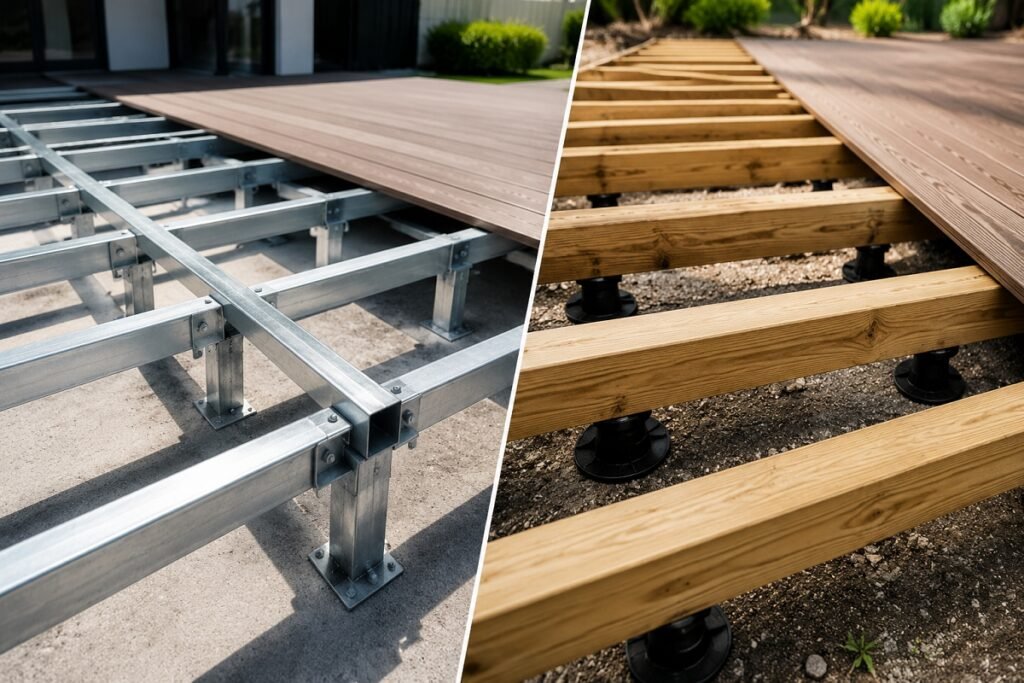
If you’re working with an existing frame, inspect every joist and bearer before laying a single board. Never put new composite boards over deteriorating timber — it’s a warranty claim waiting to happen.
Can You Use Timber Subframes Under Composite Decking?
Yes, but only H3 or H4 treated timber meets the standard. The H-grade system rates timber against moisture and insect exposure. H3 suits above-ground applications with regular wet/dry cycles. H4 handles ground contact. Basic softwood or untreated pine doesn’t meet either grade. In coastal or high-humidity areas, H4 is the safer choice.
Can You Install Composite Decking Directly on the Ground?
No. Composite boards must sit on a raised subframe with at least 100–150 mm clearance between joists and the ground. Direct ground contact traps moisture, blocks airflow, and speeds up subframe decay.
Mistake 2: Getting the Expansion Gaps Wrong
Composite boards move with temperature changes. In Australian summers, that movement is more than most builders expect.
Too-tight gaps cause boards to buckle and push against each other. Too-wide gaps are a trip hazard and look poor. Boards in direct sun can reach 60°C or higher — that’s a lot of thermal movement to account for.
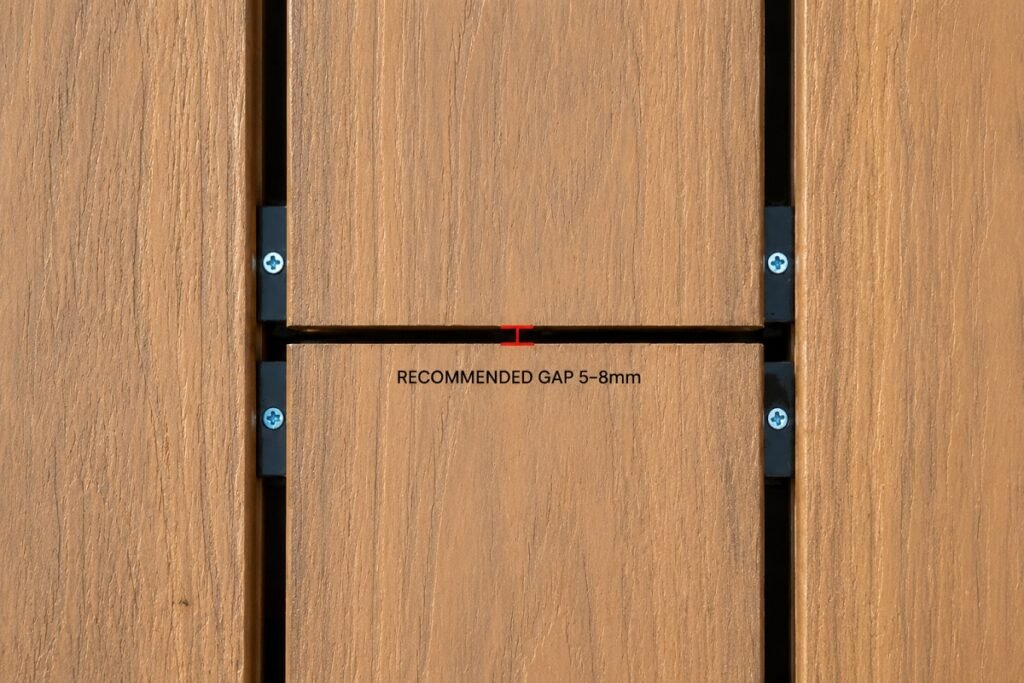
Correct composite decking gap sizes:
- Between board sides: 3–6 mm
- Between board ends: 6–10 mm
- At walls, posts, and perimeter: 10–13 mm
Hidden stainless steel clip systems set side gaps automatically. That’s one strong reason to use them — they take the guesswork out of spacing.
What Happens If You Don’t Leave Expansion Gaps?
In Queensland and the Northern Territory, boards with no room to move will buckle upward under peak summer heat. In severe cases, boards shear their fasteners — and the whole run needs relaying.
Our HDPE-based composite boards absorb just 0.2% water (ASTM D1037). Moisture-driven movement is minimal. But thermal movement is real, and it must be planned for regardless of the product.
Mistake 3: Setting Joist Spacing Too Wide
Composite boards flex more than hardwood timber. They need closer joist support to stay firm underfoot over their lifetime.
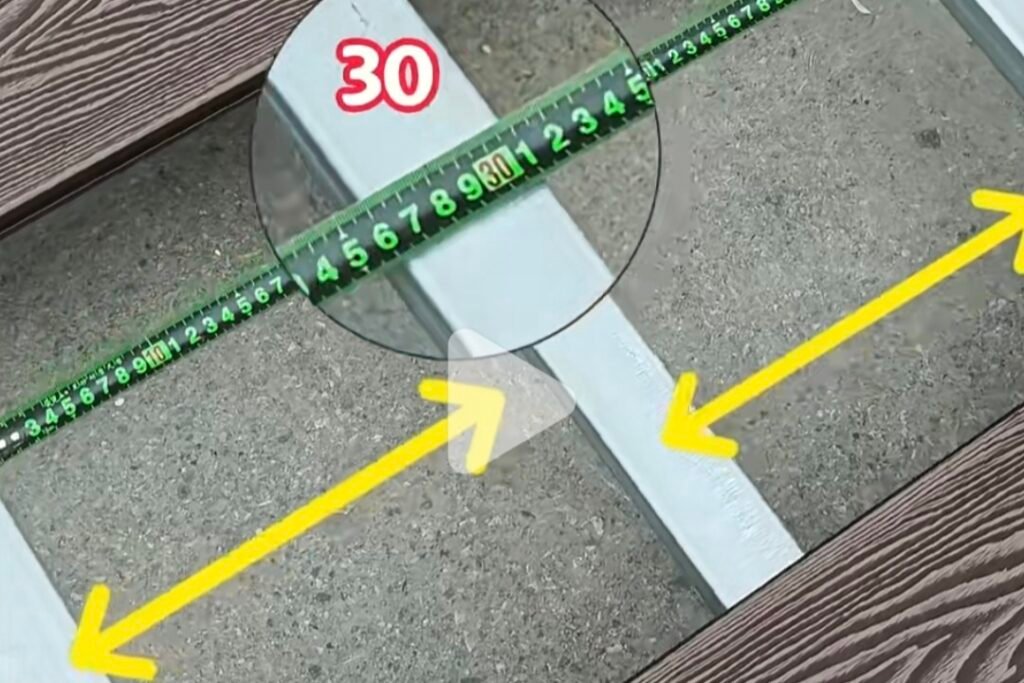
Wide joist spacing leads to bounce and surface flex. Over time, that flex causes boards to sag or crack — especially in high-traffic areas. The right spacing depends on your layout:
| Layout Type | Max Joist Spacing | Notes |
|---|---|---|
| Standard parallel | 300–350 mm | Most home applications |
| Diagonal (45°) | 300 mm | Boards span joists at a longer angle |
| Commercial / high-traffic | 300 mm | Tighter support across the full run |
Our composite decking boards test at 26.2 MPa flexural strength under EN 15534. That’s a strong result — but proper joist support is still required to prevent surface flex over time. Always check the installation spec for your specific board profile. Hollow and solid boards have different requirements.
Mistake 4: Poor Drainage and No Sub-Deck Airflow
Composite boards resist water well. The subframe underneath them doesn’t — not if it sits in a permanently damp space.
Flat decks with no fall, decks fully boxed in on all sides, and decks built too close to the ground all trap moisture. That accelerates subframe decay and builds mould. Build with a 1–2% slope (10–20 mm per metre) so water runs off the surface. Keep the perimeter open, or use ventilated screening — never seal the sub-deck cavity on all sides.
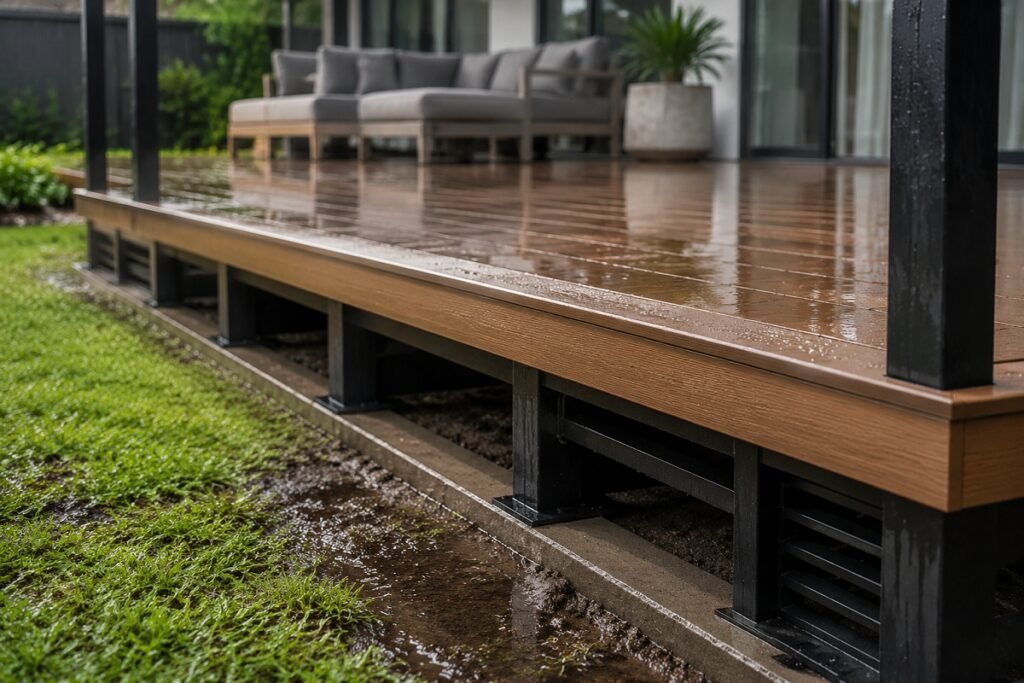
How to Prevent Moisture Build-Up Under Your Deck
Three things make the biggest difference. First, set the frame with a 1–2% fall so water drains away, not pools. Second, keep at least 100–150 mm of clearance between the ground and the bottom of your joists. Beyond that, clear board gaps regularly — leaves and organic matter trap moisture and cause surface staining over time.
Our composite boards absorb just 0.2% water (ASTM D1037), so the boards themselves won’t soak up moisture. But poor drainage under the deck will still destroy a timber subframe and create slippery surfaces over time.
Mistake 5: Using the Wrong Fasteners
Standard timber screws are the wrong tool for composite decking. They corrode, split board edges, and restrict the thermal movement your boards need. Using them is one of the fastest ways to void a warranty — and end up with boards that lift, crack, or sit unevenly.
Use hidden stainless steel clip systems instead. These slot into grooved board edges, hold the correct spacing, and allow controlled thermal movement. For face-fixing where clips aren’t possible, pre-drill and use colour-matched composite-rated screws. Don’t overtighten — pinning a board too firmly stops it from moving, and that causes cracking.
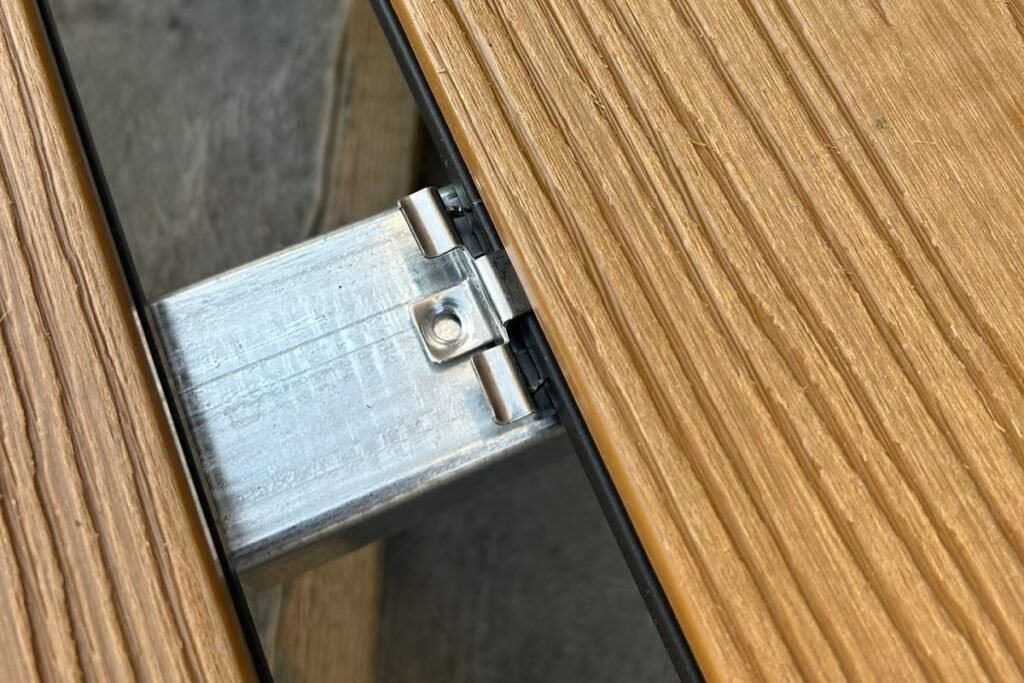
Should You Use Stainless Steel Clips for Composite Decking?
Yes — especially in coastal areas and BAL-rated zones. Standard galvanised or zinc clips corrode in salt air and under UV. Stainless steel holds its integrity for the life of the deck. In bushfire-prone areas, stainless steel fixings are a requirement, not a preference.
Warranty coverage requires installation to follow the manufacturer’s specs — and that includes the fixing system.
→ Request Free Samples to see the board profiles and clip system together before you spec the job.
Mistake 6: Skipping Board Acclimatisation
It’s a quick step — and skipping it causes problems that take days to fix.
Composite boards need 48–72 hours to adjust to the ambient temperature and humidity of the site before installation. Boards transported in cold conditions, then laid straight off the delivery truck, will expand once they heat up. That leads to unexpected movement, buckling, and misaligned spacing.
Store boards flat, fully supported, and out of direct sun. Don’t stack them unevenly — uneven support can cause boards to bow before they’re even laid.
Skipping acclimatisation can void the warranty. Most manufacturers cover defects only when installation follows the specified process — and that includes letting boards adjust to site conditions first.
Mistake 7: Ignoring BAL and Fire Compliance
In Australia, this is the mistake with the highest consequences.
If the project sits in a bushfire-prone area, the decking must meet fire resistance requirements under the National Construction Code (NCC). BAL ratings run from BAL-12.5 through BAL-FZ. Using non-compliant boards in a BAL-rated zone can mean a failed inspection, a voided insurance claim, or — in the worst case — contributing to fire spread.
Not all composite decking performs the same in fire. Boards with thin or no cap layers may test differently from what their data sheet suggests. Confirm that fire test results cover the full capped product — not just the core material.
What Fire Test Data Should You Ask Your Supplier For?
Ask for ASTM E84 results — the Flame Spread Index (FSI) and Smoke Developed Index (SDI). An FSI of 85 or below is acceptable under ASTM E84 Class B.
LastElegance composite decking boards test at FSI 85 and SDI 300 under ASTM E84. That data applies to the full capped board, not just the core. Always confirm BAL rating compliance with a local building certifier before specifying materials — state and local certifier interpretation of the NCC can vary.
Before specifying composite decking for a BAL-rated zone, check:
- The product’s ASTM E84 FSI and SDI results
- Those test results cover the full capped board — not just the core
- The BAL rating required for the specific site
- State and local certifier requirements under the NCC
- That the supplier can provide a current test report, not just a data sheet claim
Mistake 8: Skipping Double Joists at Board Ends
When two board ends meet — a butt joint — each end needs its own joist support. Many builders try to fix both ends to the same joist, or leave one end unsupported. The free end bounces, flexes, and works the fastener loose over time.
The fix is straightforward. Install a double joist at every butt joint. Leave a small gap between the two joists for airflow, and fix each board end to its own joist using the correct clip or screw. This matters most on longer spans and in high-traffic areas.
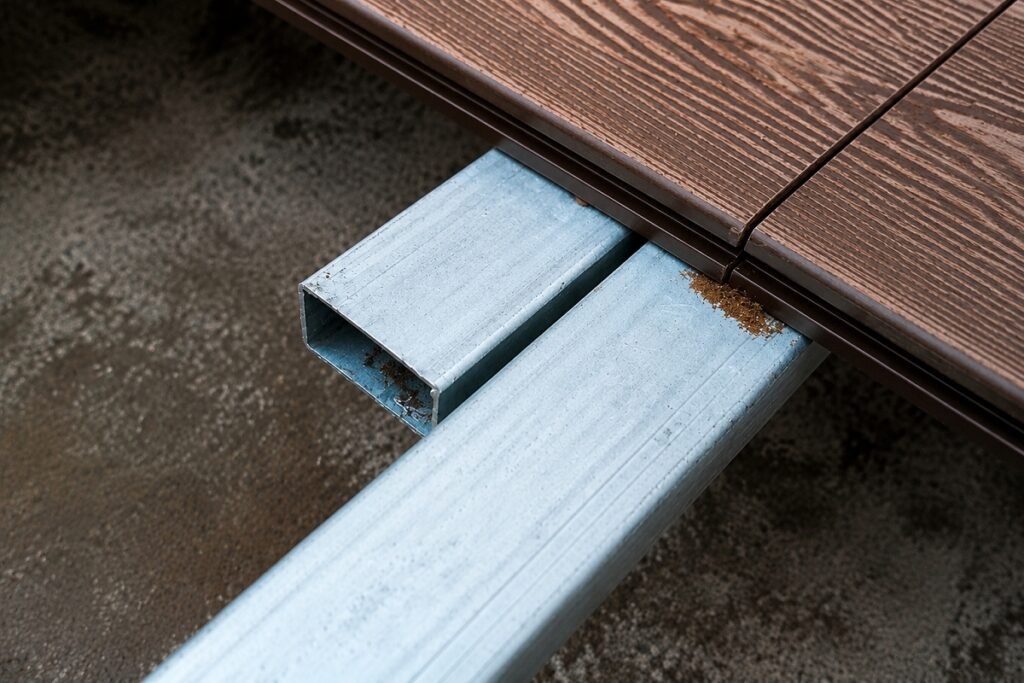
It’s one of the most common call-backs professional installers encounter when they’re fixing other builders’ work. A deck can look perfect on day one — and start failing at the joints within a year if this step is skipped.
A Quick Checklist Before You Start
Use this before the first board goes down. Every item maps directly to manufacturer installation specs — following the spec sheet is the most reliable way to protect the warranty and the finished result. Need the full installation process first? Read our how to install composite decking guide before you frame up.
- [ ] Subframe is galvanised steel, aluminium, or H3/H4 treated timber
- [ ] Ground clearance is at least 100–150 mm below joists
- [ ] Frame has a 1–2% slope for drainage
- [ ] Joist spacing suits your board profile and layout (300–350 mm parallel; 300 mm diagonal and commercial)
- [ ] Boards have acclimatised on site for at least 48–72 hours
- [ ] Gap sizes are correct: 3–6 mm side, 6–10 mm ends, 10–13 mm perimeter
- [ ] Stainless steel clip system matches the board profile
- [ ] Double joists are in place at every butt joint
- [ ] BAL rating is confirmed — product is compliant with NCC requirements
As a manufacturer supplying direct to trade, LastElegance provides full product specs, installation guides, and volume pricing. Get in touch to discuss your next project.
FAQ
How much gap should you leave between composite decking boards?
Leave 3–6 mm between board sides, 6–10 mm at board ends, and 10–13 mm at walls and perimeter structures. These figures can vary by product and climate zone — always confirm with the manufacturer’s installation guide before you frame up.
Do composite decking boards need to acclimatise before installation?
Yes — allow 48–72 hours for boards to adjust to site conditions before laying. Store them flat, fully supported, and out of direct sun. Skipping this step can cause unexpected board movement and spacing issues after the deck is complete.
Can you use standard timber screws for composite decking?
No. Standard screws corrode, split board edges, and restrict thermal movement. Use hidden stainless steel clip systems or composite-rated screws, following the manufacturer’s specified fixing method.
What happens if you don’t follow the manufacturer’s installation guide?
You risk voiding the product warranty. Most warranties cover structural and appearance defects under normal use — but only when installation follows the specified method, including subframe type, joist spacing, gap sizes, and fixing systems.
Can composite decking be installed in stages across multiple site visits?
Yes — but plan your expansion gaps and fastener positions for the full deck from the start. Boards installed in separate stages must maintain consistent spacing throughout, or the joins between stages will look uneven and create movement issues over time. Map out the full run before the first board goes down.
How long does composite decking installation take?
It depends on deck size, crew size, and subframe complexity. For a 30 m² deck with a prepared subframe, an experienced two-person team can typically complete the boards in a single day using a hidden clip system. Subframe preparation is usually the longest part of the job.
Can you install composite decking diagonally?
Yes — but diagonal (45°) layouts need tighter joist spacing. Reduce centre-to-centre spacing to 300 mm, down from the 300–350 mm used for parallel layouts. This accounts for the longer unsupported board span across the joists.